Step 1. Install LBOX as per installation instruction outlined
here. Follow the instruction and make sure LBOX is capable of creating PDF files from QAD reports or print forms.
Step 2. Make sure the LBOX email feature is working properly. This section explains what to do.
Step 3. To implement Auto-invoice, you need to understand the process first.
More than likely, not all of your customers would like receiving invoices via email, however, as you start offering this service you’ll find that more and more will sign up.
A) In this example, we assume that each customer who signed up for Auto-Invoice has only one email address where invoices will be sent. Customer email addresses will be stored in the cm__chr04 field of cm_mstr (customer master) table in QAD. If the cm__chr04 value is blank, it means that the customer does not want to receive invoices via email.
You can create a simple maintenance program and place it in the QAD menu for Customer Service group to maintain the list. Our program source is here. Feel free to modify to meet your needs.
B) The QAD menu 7.13.3 Invoice print program needs to be modified. You will have 2 versions of this program. One is your original Invoice Print and the second is Auto-invoicing customers Invoice Print. Let’s assume the second one will be installed into 7.13.30 menu. We will explain later what changes should be made to this program. For now, we are just outlining the new invoicing process.
7.13.30 should always be run first before the original 7.13.3. This way all Auto-Invoice customers will be invoiced and the “invoiced” flag of order records will be updated to YES. 7.13.30 can be run in batch mode or interactively from the QAD menu. Select LBOX PDF output that is suitable for your invoice form. See below for instructions to do that.
Then run the regular 7.13.3 program. All the remaining customers will be invoiced the same way you invoice them today. This step remains intact.
C) Now, let’s review the changes to be made to your original 7.13.3, i.e. how to create 7.13.30 from 7.13.3. Below is a sample source code we have developed for one of our clients. The program source is here.
We took sosorp10.p program of QAD 2009 SE and added some modifications there. See markers throughout the code /*AK*/ and also block in line 455 marked
/***** 32Soft (AF) Added Logic Starts Here *****/
In the nutshell, the purpose of the modification was to break the single print program output stream into a few smaller ones, where each stream is a unique Invoice.
Also the program xxsosorp10.p inserts one extra line to each output stream, see line 492. This is embedded email instruction to LBOX, vEmailTo, vEmailSubj, vEmailName, vEmailBody.
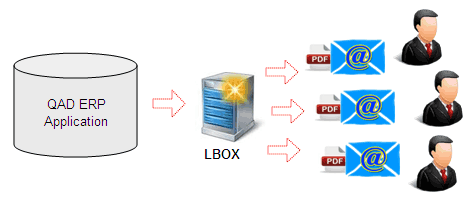
LBOX receives output streams sequentially and emails them one by one, per instruction. Customers receive personalized emails with invoices as a PDF attachment.
D) Creating PDF Invoice form. Read this section to understand the process.
The text stream from QAD is merged with static PDF template. Use $LBOX2ws\LBOXSvr\32prn\pdf\company.doc and edit it in MS Word as a starting point. Alternatively, draw your own template in MS Word. Then convert it to PDF and place it to $LBOX2ws\LBOXSvr\32prn\pdf\. Make sure the resulting PDF template is light in size, recommended size is 20-40 Kbytes. Do not to exceed 70-100 Kbytes. Do not use heavy graphics. Otherwise, email attachments will become large and since emails are sent sequentially, the auto-invoicing process will take longer and use up your email server’s resources.
This section explains how to adjust PDF page parameters.
E) Auditing outbound emails. There is a log file $LBOX2ws\emOutbound.log, which you can browse to see if emails have been sent successfully or rejected.
Similarly, Customer Statements can be automated or Payment Remittances, etc.
Contact us if any questions. Good luck and enjoy LBOX!
Go Back to LBOX Manual Page