


Introducing LBOX
How it works?
How to install LBOX in 3 steps:
Step 1) LBOX Installation on Windows File Server
Step 2) Setup to be done in QAD Server
Step 3) Setup to be done in QAD ERP
Understanding Document Sections in LBOX.ini
Testing LBOX
Service Logging
Distributing Documents via Email
Ways to Inject Email Commands
Email Templates
Implementing non-English PDF forms
How to upgrade LBOX
Delivering Documents to iPhone/iPad users
How to change PDF attachment file name in the outbound email
How to print email content dynamically from Progress 4GL program
How to implement barcode print to PDF
How to print PDF directly to a printer
Other useful links:
Troubleshooting LBOX when something does not work
PDF Page Parameter Reference
How to enable printing Chinese PDF’s from QAD. Detailed instruction.
Implementing Auto-invoicing in QAD
Auto Emailing Supplier Schedules from QAD with LBOX
Introducing LBOX
LBOX is a PDF and Excel document generator and distributor. It is designed specifically for QAD users and helps them automate their report or document generation processes and improve information sharing among groups, particluarly those who do not have access to QAD ERP. It helps to lower operating costs and maximize the use of QAD software.
LBOX has an easy-to-use reliable platform that allows you to …
– Auto-invoice your customers: at Invoice Print the system generates invoices in PDF format and emails them directly to customers.
– Convert QAD documents or reports immediately to PDF or Excel and placed on the network share.
– Generate and save QAD month end reports automatically to a windows network share.
– Email QAD reports in PDF or Excel formats to your team members or partners in personalized emails.
The following documents are good candidates to be automatically generated and distributed:
- Price lists updates
- Customer Statements
- Payment remittances
- Sales and Service Invoices
- AR Debit/Credit memos
- Purchase Orders
- Supplier schedules
- Sales Order acknowledgments
- Other not listed here

How it works
LBOX runs on a windows file server as a Windows service.

When the user sends a print job to a new QAD printer called “LBOX,” a shell script transfers QAD output to LBOX windows service producing final Adobe PDF, MS Excel documents, text files or outbound personalized emails with attachments. LBOX peocesses TCP/IP requests from single or multiple QAD servers in real time.
How LBOX creates PDF documents?

QAD text stream is merged with a static PDF template. Draw your own template in MS Word and convert it to a PDF. By specifying merge form parameters, you can define font size, type, margins, line spacing, etc. This article explains all the mechanics and how to adjust.
How LBOX creates Excel sheets?
Similar to 32printer, LBOX converts the majority of QAD reports, standard and custom, to Microsoft Excel. Built-in logic parses text into rows and columns according to the report layout, it expects the QAD report to conform single frame structures, like the following example:
      Site Location Description. Type Perm
      ---- -------- ------------ ---- ----
      1000 A0000001 Raw Material A001 No
      1000 A0000002 Raw Material B001 No
      1000 C0000005 Raw Material B005 No
      .....
      1000 Z0000100 Raw Material Z999 No
Note: When exporting to Excel, some character values may be misinterpreted and displayed as numeric type, which will cause leading zeros to be dropped. Excel can also add thousand group separators to such values, causing users confusion. For example, Customer code 01000000 will be displayed as “1,000,000” in Excel. To fix the problem you will need to add a line to a file called “columns.ini” located in the 32prn sub-folder of the LBOX main folder. This line should contain the QAD report column label value. For example, if the QAD report has a field with a column labeled “Location,” add a line to columns.ini which will contain the exact same value “Location.” Or, if different reports have labels “GL Account”, “GL Acct” or “GL Acc,” you may add a line to columns.ini with value “GL Acc*.” LBOX will recognize and present codes as character values. In another words, you may enter either a full label name or partial one with “*” at the end. For example:
LOT
SERIAL*
Lot/Serial*
Invoice
GL Acc*
Starting with version 3.17, a new file called simplereports.ini can be updated in the 32prn folder specifying which reports should be parsed without considering them a header/detail type of report. For example:
27.6.5.3
LBOX Installation on Windows File Server
The installation process is very straightforward and takes only a few minutes. After downloading the distribution zip file, decide where LBOX home directory will be on the file server. Unzip the package content to that location, for example c:\LBOXSrv. Make sure the package is unzipped correctly, retaining sub-directory structure as shown below.

Find a configuration file called LBOX.ini in $LBOX home directory.
[Server]
port        = 10089                              LBOX Service port
home        = 32prn                              Leave as is
bodyfiles   = emailTemplates                     Email Body template Dir
emlsrv      = mail.company.com                   SMTP server name or IP
emport      = 25                                 SMTP server port
sender      = qadbatch@company.com               Sender Email account
info        = QAD_system                         Sender Name to appear in outbound email message
emailUID    = qadbatch@company.com               Email Sender Login
emailPWD    = pa55word                           Email Sender Password
emlog       = emOutbound.log                     Email log file
;emlog=emails\Emails-%y-%m-%d.log                ways to rotate email log
;emlog=D:\logs\Emails-%y-%m-%d.log
ModulePath  =                                    Leave as is
;emmaxsize  = [defaults to 3Mb]                  Max Email file size
LogFileFormat=logs\LBOX-%y-%m-%d.log             Log file name, format and directory, v3.07 onward
LogFileDuration=60                               Number of days the log files will be kept, v3.07 onward
adminEmail=administrator@company.com             email notifications to sysadmin account, v3.07 onward

[report]                                         document section
saveDir     = c:\temp                            Save report to c:\temp directory

[pdfLrpt]                                        document section
saveDir     = c:\temp                            Save document to c:\temp directory
template    = 32prn\pdf\rptL132.pdf              Create PDF by merging with PDF template
pdfparams   = -t 210 -l 30 -f 9 -s 10 -n 43      Text parameters

[pdfPrpt]
saveDir     = c:\temp
template    = 32prn\pdf\rptP80.pdf
pdfparams   = -t 40 -l 20 -f 8 -s 12 -n 43

[form]                                           document section
saveDir     = c:\temp                            Save document to c:\temp directory
template    = 32prn\pdf\company.pdf              Create PDF by merging with PDF template
pdfparams   = -t 40 -l 63 -s 13 -n 43            Text parameters
mergeBefore =                                    append a PDF before page 1 (optional)
mergeAfter  = 32prn\pdf\tnc.pdf                  append a PDF after last page (optional)

[FormEmail]
saveDir  = c:\temp
template = c:\32prn\pdf\company.pdf
pdfparams=-t 40 -l 63 -s 13 -n 43

[xls]                                            Excel Output
saveDir = c:\temp                                If section is called xls this dir is used
;inputGroupSeparator= [defaults to user locale]  Optional  Remove ";" to enable this param
;inputDecSeparator= [defaults to user locale]    Optional
;dateFormat= [defaults to "mm/dd/yy"]            Optional
;excelDirective= [empty by default]              Optional
;nextSheet= [empty by default]                   Optional
;outDateFormat = mm/dd/yy                        Optional - defines date format in Excel
Review and edit [Server] section of this file for now, save it when done.
Starting with version 3.21, LBOX can use two email clients: blat (default) and cmail.
In order to specify the email client use the next setting:
emClient = cmail
Being an administrator on the server, click on the install.cmd script. The program will register LBOX as windows service and also start it up. Open “Services” from the server control panel and find the LBOX tab.

By default, LBOX service is started with local system credentials. It’s recommended to run LBOX under domain admin account credentials, but not necessary. This is a must in case LBOX to save documents on to network drives. In this case server local system credentials will not have permissions to access network resources. To do that, open LBOX service properties and submit valid domain admin credentials here as shown.

Please note: every time you make changes to LBOX.ini, make sure you restart LBOX service after that, in order to changes to take effect.
Setup to be done in QAD Server

Copy all files from “nix_scripts” directory to QAD server, for example to /qad/lbox directory. Make sure LBOX2c.jar file is copied as binary file, whereas others copied over as text files. Otherwise there might be errors running lbox.sh script. Set permissions to 755 for all files.
cd /qad/lbox
chmod 755 *
Edit LBOXc.ini file, “host” parameter should be pointing to windows file server IP address, “port” is port number.
host = 192.168.1.202           Should be pointing to windows server IP or name
port = 10089                   Port should be the same as in LBOX.ini
Review lbox.sh script, change variable JAVA_HOME to point to JRE or JDK.
JAVA_HOME = /qad/jre1.5.0_12
Please note: QAD software is bundled with Progress RDBMS software which has Java run-time (JRE) environment included. If your server has Java Development Kit (JDK) installed, it will be OK too. LBOX requires JRE or JDK version 1.4 or higher. If Java is not installed on your QAD server, please contact your server OS vendor or visit Java Download .
Setup to be done in QAD ERP
Create new printer outputs in QAD’s menu 36.13.2 as shown below.
Each LBOX output defines how PDF document should be generated and what should be done with it afterwards.
mgmgmt05.p b+            36.13.2 Printer Setup Maintenance             08/15/07
+----------------------------- Printer Definition -----------------------------+
¦      Output To: lbPDFFL                           Destination Type: Default  ¦
¦                                                       Printer Type:          ¦
¦    Description: LBox PDF Landscape                    Lines / Page: 64       ¦
¦      Max Pages: 0                                    Scroll Output: no       ¦
¦Device Pathname: cat >lb$PPID                               Spooler: yes      ¦
+------------------------------ Printer Control -------------------------------+
¦ Initialize Command:                                                          ¦
¦                                                                              ¦
¦    Initialize Ctrl:                                                          ¦
¦                                                                              ¦
¦  80-Col Start Ctrl:                                                          ¦
¦                                                                              ¦
¦ 132-Col Start Ctrl:                                                          ¦
¦                                                                              ¦
¦         Reset Ctrl:                                                          ¦
¦                                                                              ¦
¦      Reset Command: /qad/lbox/lbox.sh lb$PPID pdfLrpt                        ¦
+------------------------------------------------------------------------------+
Create similar LBOX printer outputs as shown below.
| Output | Description | Device Pathname | Lines/Page | Script | Spooler | Section | Email List ID |
| lbPDFL | PDF 132 char Landscape | cat >lb$PPID | 64* | /qad/lbox/lbox.sh | yes | pdfLrpt | |
| lbPDFP | PDF 132 char Portrait | cat >lb$PPID | 64* | /qad/lbox/lbox.sh | yes | pdfPrpt | |
| lbPDFF | PDF 80 char Portrait form w logo | cat >lb$PPID | 64* | /qad/lbox/lbox.sh | yes | form | |
| lbPDFem | Email PDF form w logo | cat >lb$PPID | 64* | /qad/lbox/lbox.sh | yes | formEmail | posting |
| lbXL | Excel report | cat >lb$PPID | 70** | /qad/lbox/lbox.sh | yes | xls | |
| lbXLem | Email Excel report | cat >lb$PPID | 70** | /qad/lbox/lbox.sh | yes | xls | posting |
Notes:
* – adjustable parameter
** – any number, 70 is recommended
*** – read more about the document sections in next paragraph, Understanding Document Sections in LBOX.ini
Understanding Document Sections in LBOX.ini
Each document section in LBOX.ini files defines how report or document should be processed. Currently, it can be saved as text file, or converted to PDF or Excel file saved and emailed to a recipient.
In order to save the report as a text file, simply define one parameter in the section “saveDir”, as shown here.
[report]
saveDir     = c:\temp
If PDF should be created, add a parameter “template” pointing to PDF background template. Also “pdfparams” parameter instructs LBOX how exactly merge text with the template.
[pdfLrpt]
saveDir     = c:\temp
template    = 32prn\pdf\rptL132.pdf
pdfparams   = -t 210 -l 30 -f 9 -s 10 -n 43
If static PDF page(s) should be appended before or after the body of the document, use “mergeBefore” or “mergeAfter” parameters as shown.
[form]
saveDir     = c:\temp
template    = 32prn\pdf\company.pdf
pdfparams   = -t 40 -l 63 -s 13 -n 43
mergeBefore =
mergeAfter  = 32prn\pdf\tnc.pdf
For more information regarding PDF page parameters please visit the following resources: PDF Page Parameter Reference
Please note: every time you make changes to LBOX control file, LBOX.ini, make sure you restart LBOX service after that, in order to changes to take effect.
Excel Ouput
In order to convert QAD report to excel, setup LBOX output in 36.13.2, which will be pointing to “xls” document section. In this case LBOX will generate excel files in directory shown across saveDir parameter in section [xls]. However, you may add many excel output directories for example: separate directories for finance, planning, customer service, operations, etc. Create sub keys under [xls] section and similar printers in QAD 36.13.2 pointing to these sub sections “xls.fin”, “xls.opr”, “xls.csr”, “xls.pln”.
[xls]                                           Excel Output
saveDir = c:\temp                               Output dir for section xls
saveDir.fin = n:\qad\confidential\finance       Output dir for section xls.fin
saveDir.csr = t:\qad\csr                        Output dir for section xls.csr
saveDir.opr = z:\reports\operations             Output dir for section xls.opr
saveDir.pln = o:\qad_reports\planning           Output dir for section xls.pln
Other Excel parameters are optional and are global for all Excel outputs, here is how they can be used:
inputGroupSeparator = .                         QAD reports are printed in EU numeric format
inputDecSeparator   = ,                         QAD reports are printed in EU numeric format
dateFormat          = dd/mm/yy                  QAD reports are printed in EU date format
Starting from version 3.04, LBOX can have [xlsx] section for alternative excel output format. This section works exactly the same way as [xls], it can have the same parameters as [xls] section. The only difference is the output format of Excel files, *.xlsx – compatible with iPhones / iPads. This LBOX feature allows you sharing QAD reports with non-QAD iPhones / iPads users in the field, sales service reps.
Starting from version 3.20, LBOX can set the output Excel file name using the ___FILE_NAME___ option, similar to How to change PDF attachment file name in the outbound email
Testing LBOX
Once QAD printers have been set up, go ahead and run any report to PDF 132 char Landscape. Make sure LBOX service is up and running. Once the report or document is sent from QAD, it momentarily appears in the specified directory on the file server. If problem, check IP address in LBOX2c.ini file, it should point to Windows server where LBOX service is running. The port number in LBOX2c.ini and LBOX.ini files should be the same. If still problem, give us a call we will help to troubleshoot.
 ppptrp.p 2+                  1.5.1 Item Master Report                 05/24/09
+------------------------------------------------------------------------------+
¦     Prod Line: 1000                          To: 1000                        ¦
¦   Item Number:                               To:                             ¦
¦     Item Type:                               To:                             ¦
¦         Group:                               To:                             ¦
¦         Added:                               To:                             ¦
¦                                                                              ¦
¦               Print Comments: No                                             ¦
¦           Reporting Currency: USD                           Output: lbPDFL   ¦
¦                                                           Batch ID:          ¦
+------------------------------------------------------------------------------+
Test Excel output. Create a new LBOX printer output for excel. Run 1.5.1 report and select excel printer, find Excel file generated in in the specified directory on the file server. Please keep in mind that not all QAD reports can be parsed to Excel, more details.
Service Logging
As windows service, LBOX writes critical and important events into Windows Application Log, which can be browsed from Windows Event Viewer:

NEW! Starting from ver 3.07 logging is performed to a file in “logs” sub-directory. LBOX no longer uses Windows Application Log. Log file name is set in LBOX.ini file as shown below.
[Server]
LogFileFormat=logs\LBOX-%y-%m-%d.log                          Log file name, format and directory
LogFileDuration=60                                            Number of days the log files will be kept
adminEmail=administrator@company.com                          email notifications to sysadmin account
NEW! Starting from ver 3.07, LBOX sends email notifications to sysadmin person. These could be errors in file processing or other system issues. Enter sysadmin email account after adminEmail parameter in [Server] section.
In addition to that, LBOX registers all outgoing email messages, whether they have been sent out successfully or not. The file name is defined in LBOX.ini file against “emlog” parameter, if parameter is omitted, LBOX does not write these events anywhere.
Starting from ver 3.14, the email log file can be rotated using file format containing %y-%m-%d
The format is simple: date time stamp, [document name – starting from ver 3.14] , file name , email recipient and status.

Starting from version 3.20 a new parameter was added to the [Server] section setting the debug detail
debug=0 – no debug info
debug=1 – debug info
debug=2 – more detail
Distributing Documents via Email
E-mail templates are located on the Windows File Server in $LBOXSvr\emailTemplates directory.
In order LBOX to send an outbound email to a recipient, insert the following command line to QAD output file. The command line is an instruction, with few elements:
ESCemail:BodyTextFile.txt&CustomerName&subject=Subject&to=user@company.com[&other parameters]

ESC                            ASCII code 002, non printable escape code
email:                         Literal constant
BodyTextFile.txt               Email template file name, should reside in [Server]"bodyFiles"
&
CustomerName                   Recipient first name, will be used in the e-mail body
&subject=
Subject                        This is the e-mail subject
&to=
user@company.com               Recipient email address
NOTE: All the rest optional parameters should be separated by &!!

List of available parameters:
 &f=    - Sender email address (optional) this is the REPLY-TO email account
 &cc=   - carbon copy recipient list (optional)
 &bcc=  - blind carbon copy recipient list (optional)
 &u=    - username for AUTH LOGIN to the smtp server
          (always use this one with pw parameter!) this is the sender account,
          in case f is not provided. If both provided u is sender and f is reply-to.
 &pw=   - password for AUTH LOGIN to the smtp server (always use with u parameter!)
Please note that &f parameter is not reliable one. Sometimes it is ignored by Email servers, especially when &f is different than &u. If you need to switch sender email account dynamically, we highly recommend to use &u with &pw.
Each command line triggers LBOX to send an email to the recipient. So if a document should be sent to 3 people, you can add 3 command lines should be added to the QAD output file.
ESCemail:poprint.txt&32 Soft Support&subject=PO Print &to=support@company.com
ESCemail:poprint.txt&Ryan&subject=PO Print &to=ryan.peters@company.com
ESCemail:poprint.txt&Mary Allyn&subject=PO Print &to=mary.goltara@company.com
   Quality Products Inc.                             P U R C H A S E   O R D E R
   One World Way
   Consolidated Business Plaza             Order Number: 1000      Revision:   0
   San Diego, CA 92130                       Order Date: 06/10/92      Page:   1
   United States of America                  Print Date: 05/07/07

       Supplier: 5001000                     Ship To: 10000

       General Supply Corporation            Quality Products Inc.
       720 East College Avenue               One World Way
       Building B-2                          Consolidated Business Plaza
       Los Angeles, CA 90293                 San Diego, CA 92130
       United States of America              United States of America
...
...
Another option to add all the three email addresses in one line, but in this case you will not be able to personalize the e-mail.
ESCemail:poprint.txt&Company Name&subject=PO Print&to=user1@company.com,user2@company.com…
LBOX will exclude these instructions from the resulting document automatically.
Ways to Inject Email Commands
Option one: via shell script. This option is good when the list of recipients is static. For example: overnight GL postings should be always emailed to the same person(s) or list of Sales Orders on-hold always should be emailed to sales managers and credit department.
Create a list of recipients in lbox.email file, which is located in QAD server. The file format allows to maintain multiple lists, simply add a line for each recipient in the follwoing format:
[List ID]&[email content template]&[Recipient's First Name]&[subject=]&[to=]
So if we need to add a list “posting” with 2 names and list “invprint” with one name, the file will look like this:
Posting&posting.txt&Doug&subject=Overnight Night Postings&to=support@company.com
Posting&posting.txt&Nick&subject=Overnight Night Postings&to=sdk@company.com
Invprint&invoiceEmailBody.txt&Peter&subject=Invoice print&to=contact@company.com
Add another printer to 36.13.2 and reset command now will have one more parameter, a pointer to email list “posting”.
mgmgmt05.p b+            36.13.2 Printer Setup Maintenance             08/15/07
+----------------------------- Printer Definition -----------------------------+
¦      Output To: lbNtPost                          Destination Type: Default  ¦
¦                                                       Printer Type:          ¦
¦    Description: LB Nite Post Email                    Lines / Page: 64       ¦
¦      Max Pages: 0                                    Scroll Output: no       ¦
¦Device Pathname: cat >lb$PPID                               Spooler: yes      ¦
+------------------------------ Printer Control -------------------------------+
¦ Initialize Command:                                                          ¦
¦                                                                              ¦
¦    Initialize Ctrl:                                                          ¦
¦                                                                              ¦
¦  80-Col Start Ctrl:                                                          ¦
¦                                                                              ¦
¦ 132-Col Start Ctrl:                                                          ¦
¦                                                                              ¦
¦         Reset Ctrl:                                                          ¦
¦                                                                              ¦
¦      Reset Command: /qad/lbox/lbox.sh lb$PPID pdfLrpt posting                ¦
+------------------------------------------------------------------------------+
Now when you print any report to lbNtPost printer it will be converted to PDF report and emailed to people who are listed under “posting” in lbox.email file.
Option two: add email command to QAD printer setup. This option is the simplest one and very quick to do but limited to one recipient only. Go to menu 36.13.2 and add email instruction to the required LBOX printer output, to the “Initialize Ctrl” fields, for example:
mgmgmt05.p b+            36.13.2 Printer Setup Maintenance             08/15/07
+----------------------------- Printer Definition -----------------------------+
¦      Output To: lbNtPost                          Destination Type: Default  ¦
¦                                                       Printer Type:          ¦
¦    Description: LBox PDF Landscape                    Lines / Page: 64       ¦
¦      Max Pages: 0                                    Scroll Output: no       ¦
¦Device Pathname: cat >lb$PPID                               Spooler: yes      ¦
+------------------------------ Printer Control -------------------------------+
¦ Initialize Command:                                                          ¦
¦                                                                              ¦
¦    Initialize Ctrl:/002email:posting.txt&Cliff&subject=Postings              ¦
¦                      &to=cvf@company.com/013                                 ¦
¦  80-Col Start Ctrl:                                                          ¦
¦                                                                              ¦
¦ 132-Col Start Ctrl:                                                          ¦
¦                                                                              ¦
¦         Reset Ctrl:                                                          ¦
¦                                                                              ¦
¦      Reset Command: /qad/lbox/lbox.sh lb$PPID pdfLrpt                        ¦
+------------------------------------------------------------------------------+
Option three: via progress programming.
This is most flexible way and only way to generate and distribute documents automatically to a dynamic list of recipients. Example: auto emailing Supplier schedules or Customer Statements periodically.
This approach will require some technical skills, however the good news is that programing changes to be added QAD programs are very minor and can be easily added by IT staff even with little experience in Progress programming. Also this logic can be easily carried over to the new version of QAD during upgrade. As you can see, LBOX by its design requires minimum QAD changes and free of any maintenance.
Below we provide a sample code, which is used to automate PO document distribution, so newly created PO will be automatically printed overnight and emailed to suppliers. As “printed” flag is updated, the documents will be printed only once.
There are 2 blocks of progress logic that should be added to QAD’s poporp03.p program. This is the higher level PO Print program, which collects user input from “Selection Criteria” prompts. See below where additional logic is added, the similar manner the other QAD programs can be modified: 7.1.3 SO Confirmation Print, 7.13.3, 7.9.13, 27.15, 27.14 and so on.
In the original QAD’ program poporp03.p First find the code lines marked below with Red comments, near the end of the program.
/* poporp03.p - PURCHASE ORDER PRINT AND UPDATE                         */
…
…
…
   /* RUN SELECTED FORMAT */
   {gprfile.i}

   {&POPORP03-P-TAG21}
   if false then do:
      {gprun.i ""porp0301.p"" "(input update_yn)"}
   end.

   {&POPORP03-P-TAG10}                                Additional code to be added before this line
   {gprun.i  """porp03"" + run_file + "".p""" "(input update_yn)"}
   {&POPORP03-P-TAG11}
   {&POPORP03-P-TAG22}                                Additional code to be added after this line

   {mfreset.i}

   if batchrun
   then
      l_runok = runok.
...
...
...
Add 2 new block of code there, green font.
/* poporp03.p - PURCHASE ORDER PRINT AND UPDATE                         */
…
…
…
   {&POPORP03-P-TAG21}
   if false then do:
      {gprun.i ""porp0301.p"" "(input update_yn)"}
   end.

/***** 32Soft Added Logic Starts Here *****/
def var vNbr  like nbr no-undo.
def var vNbr1 like nbr1 no-undo.
def var vEmailTo   as char no-undo.
def var vEmailSubj as char no-undo.
def var vEmailName as char no-undo.
def var vEmailBody as char no-undo.
assign vNbr = nbr vNbr1 = nbr1.
/*This for-each logic is taken as is from porp0301.p*/
for each po_mstr no-lock
 where (po_nbr >= vNbr) and (po_nbr <= vNbr1)
 and (po_vend >= vend) and (po_vend <= vend1)
 and (po_buyer >= buyer and po_buyer <= buyer1)
 and (po_print or not new_only)
 and (po_ord_date >= ord_date) and (po_ord_date <= ord_date1)
 and (po_lang >= lang and po_lang <= lang1)
 and (po_stat = "" or not open_only)
 and (not po_sched or include_sched)
 and (not po_is_btb or incl_b2b_po)
 and po_type <> "B",
 first ad_mstr no-lock where ad_addr = po_vend by po_nbr:
 assign nbr = po_nbr nbr1= po_nbr
 vEmailTo   = 'cdf@company.com'                    /*replace the value with field where email address is stored*/
 vEmailSubj = 'PO print ' + po_nbr                          /*change if required*/
 vEmailName = IF ad_attn <> '' THEN ad_attn ELSE 'Supplier' /*replace the value with field where first name is stored*/
 vEmailBody = 'POEmailBody.txt'.                            /*change if required*/
 {mfreset.i}
 output through value(path) page-size value(printlength).
put control chr(2) "email:" vEmailBody "&" vEmailName "&subject=" vEmailSubj "&to=" vEmailTo chr(10).

 {&POPORP03-P-TAG10}
 {gprun.i """porp03"" + run_file + "".p""" "(input update_yn)"}
 {&POPORP03-P-TAG11}
 {&POPORP03-P-TAG22}

end. /*for each*/
assign nbr = vNbr nbr1= vNbr1.
 unix silent sleep 1.
/***** Added logic ends here *****/

{mfreset.i}
...
...
...
It does make sense to maintain customer and other partner’s email addresses along with their names in QAD database. You can store it anywhere of your choice: ad_mstr, vd_mstr, ls_mstr, code_mstr, usrw_wkfl, custom table. Then you can pull this information and assign to variables.
Once the change is made and poporp03.p is compiled and installed, you can run PO Print either interactively or submit as a job to daily batch like shown below.
 poporp03.p 2+                5.10 Purchase Order Print                05/25/09
+------------------------------------------------------------------------------+
¦Purchase Order:                               To:                             ¦
¦      Supplier:                               To:                             ¦
¦         Buyer:                               To:                             ¦
¦    Order Date:                               To:                             ¦
¦   Language ID:                               To:                             ¦
¦                                                                              ¦
¦          Open PO's Only: Yes    Print Features and Options: No               ¦
¦     Unprinted PO's Only: Yes        Include Retained Taxes: Yes              ¦
¦ Include Scheduled Order: No                     Sort PO By: Site             ¦
¦   Print Bill-To Address: Yes                     Form Code: 1                ¦
¦      Include EMT Orders: No                         Update: Yes              ¦
¦                                                                              ¦
¦ Message:                                                                     ¦
¦                                                                              ¦
¦                                                             Output: lbPOprt  ¦
¦                                                           Batch ID: DAILY    ¦
+------------------------------------------------------------------------------+
Please note that selected lbox printer output “lbPOprt” does not need to point to email list, since email command lines will be added by print program.
Email Templates
One of the server’s parameters in LBOX.ini file is “bodyfiles”, it is pointing to a directory where email templates are located. Email templates are plain text files, where you can add variable $name. At the run time, the variable will be replaced with recipient first name.
Below is the content of an email template, “POEmailBody.txt”.
Dear $name,
Please find attached PO from 32Soft.
Have a Great Day!
32 Soft Team.

Starting with version 3.20, LBOX can use HTML email templates
Implementing non-English PDF forms
LBOX can produce non-English PDF documents, for example Chinese, Korean or Japanese PDF forms and other languages. Here is how you can do this.
1. Make sure the Windows file server, where LBOX is running, has the local language pack installed. For example if we need to print documents in Chinese, make sure Chinese language pack is installed and you can read Chinese text files in notepad.exe on the server.
2. in QAD server where Chinese DB is running, add the following option in lbox.sh script:
$JAVA_HOME/bin/java -Dfile.encoding=GB2312 -jar LBOX2c.jar $nfile $section
3. Use alternative font settings in form sections of LBOX.ini file, located in $LBOX home directory on Windows file server.
-an (Alternative Font)
-af (Alternative font size)
The alternative font is used to print non-ASCII characters (characters greater than 255 in Unicode)
Now -n parameter can be used with font name, like this:
Sample:
-n “MyFont.ttf” -an “chineseFont.ttf” -af 10
This way you can use Server Machine Fonts in addition to built in fonts.
Create new forms for Chinese with corresponding alt fonts in them, like this:
[ChineseForm]
saveDir   = c:\temp
template  = 32prn\pdf\company.pdf
pdfparams = -t 25 -l 20 -s 13 -f 11 -Charset gb2312 -an "Dotum" -af 8
Please note that you also have to use new -Charset parameter in the form. It defines the codepage, – how LBOX should interpret incoming non-English text stream. For Chinese it’s gb2312 for Korean ksc5601, etc. The value for Charset can be found in non-English QAD progress Character Client scripts.
4. Restart LBOX service and try the new form. It should come out properly. If not, please generate a QAD report with Chinese text via LBOX, so it will appear in LBOX file server directory. Open the text file in Notepad.exe in the LBOX file server. By changing font name in Notepad.exe, you should be able to see Chinese characters properly. If so, use the same Chinese font name in LBOX form and try again.
Please also check :
How to enable printing Chinese PDF’s from QAD. Detailed instruction
How to upgrade LBOX
1. Stop LBOX service from the service tab in your Windows file server. IMPORTANT!!! Make a backup copy of the entire LBOX directory. Most cases it’s c:\LBOXSvr.
2. Download LBOX package from this page. This package has a trial license file and default configuration files.
3. Replace only the following files in LBOX home directory with the newer ones from the downloaded package:
$LBOXSvr\*.exe
$LBOXSvr\*.dll
$LBOXSvr\32prn\*.exe
$LBOXSvr\32prn\*.dll
$LBOXSvr\32prn\*.lib
4. Start LBOX service from Service tab. Run some tests by printing some documents from QAD. Make sure the upgraded version is working well.
Delivering Documents to iPhone/iPad users
Starting from version 3.06, LBOX is supporting iOS users. Generated PDF and Excel documents can be emailed to iPhone/iPad users, where they can be viewed.
There is known issue with viewing PDF’s in iPhone/iPad, sometimes the font is not visible in PDF documents. This happens because the font, selected to be used on generated PDF’s, is missing from iOS, iPhone/iPad operating system. This issue can be easily solved by adding a new option -EmbedFonts to the appropriate form section of $LBOX\LBOX.ini config file. Please always use this option, especially in the forms to be delivered to iOS devices. Here is the sample:
formName   = Report 132 Portrait
template   = .\pdf\rptP80.pdf
pageParams =  -t 40 -l 20 -f 8 -s 12 -n 43 -z 90 -Charset gb2312 -an "Dotum" -af 7 -EmbedFonts
How to change PDF attachment file name in the outbound email
By default LBOX generates random file names, like 201209122136024889.pdf… Sometimes it’s useful to generate PDF’s with document file names. For example if we have invoices IN23445, IN23446, IN23447, etc, we want PDF attachments be named IN23445.pdf, IN23446.pdf, IN23447.pdf, etc. You can do this starting from version v3.07.
You can define PDF file name from within QAD progress program which generates raw file. Following the example with invoices above, we can use “put control” 4GL statement adding the marker line to the invoice file, like shown below.
PUT CONTROL chr(10) "___FILE_NAME___" so_inv_nbr ".txt" chr(10).
The value after marker “___FILE_NAME___” and before carriage return character chr(10) will be the raw file name, which in turn will be converted into PDF file attached to outbound email. Important to know that the marker line should always start from the marker “___FILE_NAME___” – that’s why chr(10) is proceeding it. Also, the file name value should not exceed 30 characters including the file extension “.txt”. And also it should be ending with chr(10). If you follow these rules, LBOX will perform properly.
How to print email content dynamically from Progress 4GL program
This feature allows QAD users a greater level of email personalization. For example QAD system sends new invoice to a customer and email body content is automatically adjusted, based on customer’s ERP records. The email would thank the customer for the prompt payment they made for the previous invoice 12345, dated 1/30/2012. Or conversely, it would remind the customer that “..Dear Customer, here is the new invoice attached 123456. And by the way, we still did not get payment for previous invoice 12345 dated 6/20/2012..”. Another great application could be to add promotional marketing messages to selected group of customers, so they would read this info in the emails, with attached new Invoices or Sales Order Confirmations, etc.
In order to change the email body content, you need to print two LBOX commands into QAD output document, instructing LBOX where email body content starts and stops. Whatever is printed between these two commands will be interpreted by LBOX to be used as email body content.
Here is the syntax:
ESCemail_message_begins
ESCemail_message_ends

Where: ESC is ASCII code 002, non printable escape code
email_message_begins and email_message_ends - Literal constants.

...[QAD report output]...
...[QAD report output]...
ESCemail_message_begins
Dear Customer!
...[your email content]....
...[your email content]....
...[your email content]....
Have a nice day!
ESCemail_message_ends
...[QAD report output]...
...[QAD report output]...
How to implement barcode print to PDF
LBox has functionality to generate PDF documents with embedded barcodes Code 39
This can be used for example for printing lists which contain item numbers to be scanned later using a barcode reader:
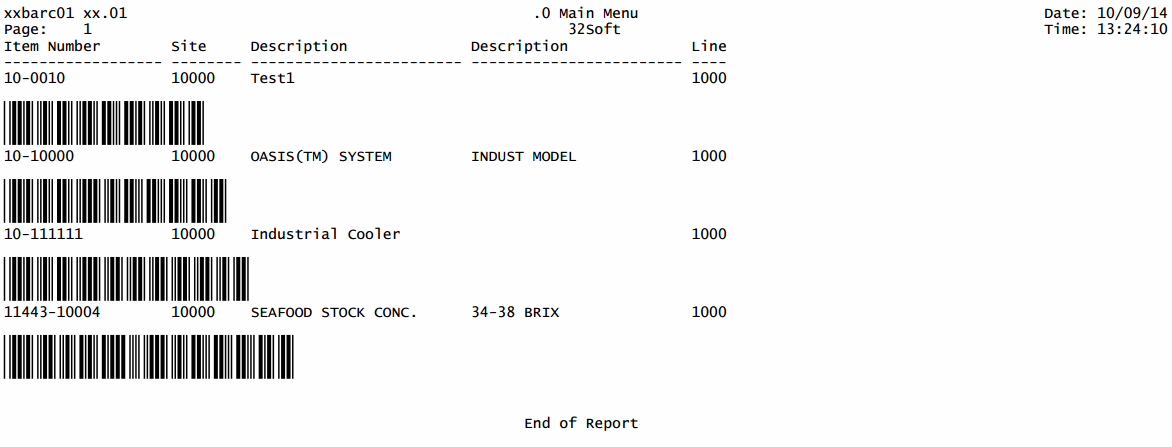
Here are the steps necessary to implement this output to PDF including barcodes:
- Download latest LBox version from this page. This version includes the 3of9 fonts needed for printing barcodes.
- Define a new PDF report entry in the LBox.ini file
For example:
[pdfBarcode]
saveDir = e:\temp\
template = 32prn\pdf\rptL132.pdf
pdfparams = -t 20 -l 30 -f 9 -s 10 -n 43 -EmbedFonts
- Save the Lbox.ini file and restart the LBox service
- Define a new LBox output in QAD, referencing the new form, and with less lines per page, to account for barcode line height
mgmgmt05.p b+            36.13.2 Printer Setup Maintenance            08/15/07
+----------------------------- Printer Definition -----------------------------+
¦      Output To: lboxBar                           Destination Type: Default  ¦
¦                                                       Printer Type:          ¦
¦    Description: LBOX Barcode                          Lines / Page: 30       ¦
¦      Max Pages: 0                                    Scroll Output: no       ¦
¦Device Pathname: cat >lb$PPID                               Spooler: yes      ¦
+------------------------------ Printer Control -------------------------------+
¦ Initialize Command:                                                          ¦
¦                                                                              ¦
¦    Initialize Ctrl:                                                          ¦
¦                                                                              ¦
¦  80-Col Start Ctrl:                                                          ¦
¦                                                                              ¦
¦ 132-Col Start Ctrl:                                                          ¦
¦                                                                              ¦
¦         Reset Ctrl:                                                          ¦
¦                                                                              ¦
¦      Reset Command: /qad/32soft/lbox/lbox.sh $lbPPID pdfBarcode              ¦
+------------------------------------------------------------------------------+
- Create new report program to output barcode values using the 3of9 font
        /* Custom Wide report template for LBox PDF Barcode Output, with email*/
        /* DISPLAY TITLE */
        {mfdtitle.i "xx.01"}

        &scoped-def visDevs "terminal,page,page100"
        &scoped-def e chr(27)
        &scoped-def st1 (if lookup(dev,{&visDevs}) = 0 then
        &scoped-def st2 else "")
        &scoped-def sNormal   {&st1} {&e} + "f43"        + {&e} + "s9 "   + {&e} + "l10 " {&st2}
        &scoped-def sBarcode  {&st1} {&e} + "fFree3of9 " + {&e} + "s36 "  + {&e} + "l38 " {&st2}

        define variable vEmailBody    as character  initial "report.txt"      no-undo.
        define variable vEmailName    as character  initial "Customer"        no-undo.
        define variable vEmailSubj    as character  initial "Test"            no-undo.
        define variable vEmailTo      as character  initial "mce@32soft.com"  no-undo.

        define variable part          like pt_part initial ""           no-undo.
        define variable part1         like pt_part initial ""           no-undo.
        define variable site          like so_site initial "10000"      no-undo.
        define variable site1         like so_site initial "10000"      no-undo.

        form
          part                                      colon 15
          part1           label "To"                colon 40 skip
          site                                      colon 15
          site1           label "To"                colon 40 skip
          with frame a side-labels width 80.
        /* SET EXTERNAL LABELS */
        setFrameLabels(frame a:handle).

        form
          pt_part
          pt_site
          pt_desc1
          pt_desc2
          pt_prod_line
          with frame c down width 134 no-box.
        /* SET EXTERNAL LABELS */
        setFrameLabels(frame c:handle).

/********** BEGIN MAIN **********/
        {wbrp01.i}

        repeat:
          if part1= hi_char   then part1= "".
          if site1= hi_char   then site1= "".

          if c-application-mode <> 'web' then
            update part part1 site site1 with frame a.

          {wbrp06.i &command = update
                    &fields  = " part part1 site site1"
                    &frm = "a"}

          if  (c-application-mode    <> 'web')
            or  (c-application-mode  = 'web'
            and (c-web-request      begins 'data'))
          then do:
            bcdparm = "".
            {mfquoter.i part  }
            {mfquoter.i part1 }
            {mfquoter.i site  }
            {mfquoter.i site1 }

            if part1= ""  then  part1 = hi_char.
            if site1= ""  then  site1 = hi_char.
          end. /* IF (c-application-mode <> 'web') ..... */

          /* OUTPUT DESTINATION SELECTION */
          {gpselout.i &printType                = "printer"
                      &printWidth               = 134
                      &pagedFlag                = " "
                      &stream                   = " "
                      &appendToFile             = " "
                      &streamedOutputToTerminal = " "
                      &withBatchOption          = "no"
                      &displayStatementType     = 1
                      &withCancelMessage        = "yes"
                      &pageBottomMargin         = 6
                      &withEmail                = "yes"
                      &withWinprint             = "yes"
                      &defineVariables          = "yes"}
          put control {&sNormal} chr(10).
          {mfphead.i}
          if dev begins "lb" then do:
            put control chr(2) "email:" vEmailBody "&" vEmailName "&subject=" vEmailSubj "&to=" vEmailTo chr(10).
          end.

          for each pt_mstr no-lock
            where pt_part>=part and pt_part<=part1               and pt_site>=site and pt_site<=site1
            with frame c:
            display pt_part pt_site pt_desc1 pt_desc2 pt_prod_line.
            down 1. /*to display barcode on next line*/

            put control {&sBarcode} '*' pt_part "*" {&sNormal}.
            down 1. /*to count the line*/

            {mfrpchk.i}
          end. /* FOR EACH so_mstr */

          /*  REPORT TRAILER  */
          {mfrtrail.i}
        end. /* REPEAT */

        {wbrp04.i &frame-spec = a}
/********** END MAIN **********/
- Compile program and run it with LBoxBar output
How to print PDF directly to a printer
Starting with version 3.20, LBOX can print generated PDF documents directly to a printer installed on the Server.
This is a separate LBOXplus version that can be sent on demand