What is 32printer?32printer is QAD’s MFG/Pro client software for Character, GUI or .NET User Interfaces. It redirects MFG/Pro raw output data to most popular desktop applications such as Microsoft Excel, Adobe Acrobat Reader, Notepad, Outlook or Lotus Notes, any other program of your choice. It’s simple yet powerful application, designed to empower your QAD users to perform their job faster with greater accuracy and efficiency. 32printer bridges the gap between server row ERP data and Microsoft Desktop Applications, delivering ultimate convenience to you. |
||||||||||||
How it works?PDF documents today are commonly accepted as substitutes of regular paper documents, but generation of PDFs cost you nothing and also is environmentally friendly compare to the paper documents. The speed you exchange PDF documents with your partners is like you would fly the rocket compare to walking by foot. Out-of-the-box 32printer generates nice looking PDF documents from your QAD system, you may immediately take advantage of emailing Purchase Orders or Invoices or Sales Order confirmations, with a click of the mouse. The chart explains how 32PRINTER overlays PDF templates with MFG/Pro output. Use MS Word for preparing your template and then use any genuine Adobe PDF product to convert it to PDF.
|
||||||||||||
Getting familiar with 32printerWhen printing a report from MFG/Pro, select 32prn output and next thing you see is 32printer window:
Use radio buttons to select the output and drop down box for PDF background templates.
|
||||||||||||
How 32printer converts QAD reports to Excel?32printer is designed to convert majority of QAD reports, standard and custom, to Microsoft Excel. Built-in logic parses text into rows and columns according to the report layout, it expects QAD report to conform single frame structure, like the following example:
      Site Location Description. Type Perm
      ---- -------- ------------ ---- ----
      1000 A0000001 Raw Material A001 No
      1000 A0000002 Raw Material B001 No
      1000 C0000005 Raw Material B005 No
      .....
      1000 Z0000100 Raw Material Z999 No
The report has to have underlined column labels and each field should be printed under respective label, when this condition is met, you get nice looking Excel spreadsheet, which can be conditionally colored, pivot table applied, converted to a multi sheet workbook, etc (see below). If report has different structure, such as multi frame layout (headers details, subtotals, etc) please refer to this topic. |
||||||||||||
Setting up 32printer in User DesktopThe software setup requires steps to be done on the user workstations and QAD server. This sections walks you through the steps to be performed on user PC. After downloading, 32printer package from our website, double click on the file, this is self-extracting archive and it will prompt you for the location, to unzip the content of the package.
In case you want to have a centralized location for 32printer select a network drive, or you may still select your local drive and copy it to the network drive later on.
Next thing, it prompts you to select terminal emulator.
Chose whether you will be using putty or your own terminal emulator. In case you selected putty, the program creates a shortcut “Putty with 32printer” on your desktop. Please note that our putty is slightly different from the original putty emulator, you will need to use our icon, “Putty with 32printer” to enjoy 32printer functionality. You can use the original putty at the same time, however 32printer functionality will not work with it. Our putty has title “Putty with 32printer” as shown below.
Creating a new connection profile, will be exactly the same as you would be using the original putty: enter host IP address or server name, port and select protocol. Make sure putty session parameters are set properly, on the left hand side, then select “session” again and click save button. When new profile is created, our PuTTY automatically assigns “32PRINTER” as a default local printer as shown below.
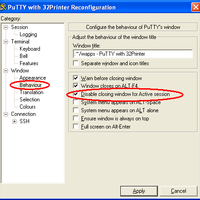
If you use an existing putty profile, i.e. previously created putty sessions are stored in windows registry, you need to manually change default printer to “32PRINTER” and save the session settings. Please check if it is saved properly, otherwise 32printer won’t work in the previously created putty session.In case you have many people who have been using putty.exe and have pre-configured putty sessions on their PCs, the following action step is required in order to make it work with 32printer: windows register entries located under [HKEY_CURRENT_USER\Software\SimonTatham\PuTTY\Sessions] should have the value of “32PRINTER” for parameter “Printer”, i.e. “Printer”=”32PRINTER” on each PC. It can be done manually or you can develop VB script to do so in batch mode during user login to windows. You may find this articles handy: http://technet.microsoft.com/en-us/library/bb727154.aspx Once you finished this step, move on to setup a new printer in QAD application. Disable closing window for Active session There is a switch in Configuration menu “Disable closing window for Active session”. The user will not be able to close the active session window only if this flag is selected:
Using third party terminal emulators If you selected to use your own terminal emulator, the program creates a new shortcut “32printer” on your desktop, it is pointing to the 32printer.exe module in 32prn home directory. Launch it. You always need to start this icon prior to start your telnet client application.
Once started, a 32printer icon appears in Windows application tray (bottom right corner in the desktop).
To stop 32printer, use mouse right click on the icon and select Exit. There is another selection “Pause”, use it when you would like QAD data to bypass 32printer application and to be sent to Windows default printer.Configuring telnet parameter 32printer has been designed to work with virtually any telnet client software. 32printer.ini is a configuration file, located in 32printer home directory. If 32printer does not work with your telnet client, please make sure the executable module name is listed in 32printer.ini as telnet or as telnet2 parameter. If not listed, find out the executable module name (use Processes Tab in Windows Task Manager) and add it. Restart your pc.Parameter “Term” defines the terminal emulator type, used in the telnet session and normally it should be blank, but it may be changed to the following values when required: Term Print ON Print OFF Note ======= =========== =========== ============================== "" "\033[5i" "\033[4i" Use Print ON and OFF commands wyse60 "\033d#" "\024" in the 32prn script for your wyse50 "\030" "\024" terminal type, more details. dg215 "\036F`" "\036Fa" ibm3151 "\020\022" "\020\024" vt52 "\033W" "\033X" tvi955 "\033`" "\033a" Main Configuration fileThere is a main output configuration file “main.ini” in the 32printer home directory. Here is its content: iniFilesDir = .\ini defaultForm = .\reportP80.ini dateFormat = MM/DD/YY excelDateFormat = MM/DD/YY inputDecSeparator = . inputGroupSeparator = , inputCharset = us-ascii ;inputCharset = windows-1250 prtSwitch = @@@^32PRINTER-SWITCH^@@@ prt_mytest = Duplex ML-2150 Series PS prt_COM1 = COM1: prt_COM2 = COM2: prt_LPT1 = LPT1: prt_LPT2 = LPT2: prt_lex = Lexmark prt_locdj = Samsung ML-2150 Series PS (Copy 1) prt_chk = Samsung ML-2150 Series PS (Copy 1) # These are Excel Switches excelSwitch = directExcelOutput excelTemplates = .\xlt excelDirective = #Excel nextSheet = NextExcelWorksheet googleCredentials = credentials.json ExcludeSideLabelsLines = yes excelAutomation = no excelFormat = xlsx # NOTE: nextSheet is deprecated. # Use excelDirective with "nextsheet" parameter instead. # NOTE: excelAutomation is ignored and set to yes when templates are used # excelAutomation is ignored and set to no when Send Excel to Google Drive or Audit Report are used # excelFormat is ignored and set to xls when excelAutomation = yes # excelFormat is ignored and set to xlsx when Audit Report is used customApp = "%ProgramFiles%\Windows NT\Accessories\WORDPAD.EXE" %RawFile% #customApp = "%ProgramFiles%\Microsoft Office\OFFICE11\WINWORD.EXE" %RawFile% # NOTE: %RawFile% is replaced with quoted full path of the 32Printer Raw File. customAppLabel = Send To &Wordpad (My Appl.) # default value: Send To Custom &Application iniFilesDir is a pointer to a directory where to PDF forms configuration files are located. It can be local directory (default) or network share, for example \\server1\pdfini. Adjusting PDF output / PDF form configuration filesEach PDF form configuration file outlines parameters, instructing 32printer how exactly PDF document to be created. [form 1] formName = Generic PO Form template = .\pdf\poform.pdf pageParams = -t 22 -l 60 -s 13 mergeBefore = mergeAfter = .\pdf\POterms.pdf formName is a name that appears in 32PRINTER Template drop down selection box |
||||||||||||
Setup in MFG/ProCharacter Interface Create a new printer in 36.13.2 menu of MFG/Pro as following: mgmgmt05.p b+ 36.13.2 Printer Setup Maintenance 08/15/07 +----------------------------- Printer Definition -----------------------------+ ¦ Output To: 32prn Destination Type: Default ¦ ¦ Printer Type: ¦ ¦ Description: 32printer output Lines / Page: 64 ¦ ¦ Max Pages: 0 Scroll Output: no ¦ ¦Device Pathname: cat >lb$PPID Spooler: yes ¦ +------------------------------ Printer Control -------------------------------+ ¦ Initialize Command: ¦ ¦ ¦ ¦ Initialize Ctrl: ¦ ¦ ¦ ¦ 80-Col Start Ctrl: ¦ ¦ ¦ ¦ 132-Col Start Ctrl: ¦ ¦ ¦ ¦ Reset Ctrl: ¦ ¦ ¦ ¦ Reset Command: /qad/bin/32prn.sh lb$PPID ; rm lb$PPID ¦ +------------------------------------------------------------------------------+ Adjust the following parameters if needed: Lines / page: 63-66 echo -n -e '\033[5i' cat $1 echo -n -e '\033[4i' Parameters “-n” and “-e” are optional in first and last lines. Save the script to a directory with public access for execution, 755. If the directory is a part of global $PATH variable for all QAD users, then no need to specify full path to 32printer script. Otherwise, specify the full absolute path to 32printer script, as in the example above.32PRINTER is ready to use. For majority of terminal types the script woks fine, it should be changed for wyse60, wyse50, dg215, ibm3151, vt52, tvi955, as well as 32printer.ini settings, see User Desktop Setup. Contact us for details. GUI Interface Create a new printer as following: mgmgmt05.p b+ 36.13.2 Printer Setup Maintenance 08/15/07 +----------------------------- Printer Definition -----------------------------+ ¦ Output To: 32prn Destination Type: Default ¦ ¦ Printer Type: ¦ ¦ Description: 32printer output Lines / Page: 64 ¦ ¦ Max Pages: 0 Scroll Output: no ¦ ¦Device Pathname: tmp.txt Spooler: no ¦ +------------------------------ Printer Control -------------------------------+ ¦ Initialize Command: ¦ ¦ ¦ ¦ Initialize Ctrl: ¦ ¦ ¦ ¦ 80-Col Start Ctrl: ¦ ¦ ¦ ¦ 132-Col Start Ctrl: ¦ ¦ ¦ ¦ Reset Ctrl: ¦ ¦ ¦ ¦ Reset Command: "c:\32prn\prnloc" tmp.txt ¦ +------------------------------------------------------------------------------+ Reset Command “\\network share name\prnloc” tmp.txt 32printer is ready to go. No need to launch 32printer icon for GUI interface. Simply run a report and select 32prn as output. If it’s a DEMO version, the DEMO banner will appear. Hit ESC or Enter to bypass, 32printer window will appear.
|
||||||||||||
Running 32printer for the first timeIf you are using “Putty with 32printer” – just double click on the icon and login to the system. If you are using your own telnet client software, make sure you start “32printer” icon prior to your telnet client session, then login to MFG/Pro as usual. Run a report for example 1.5.1 for a short range of Items, like shown below and select 32prn as printer output. ppptrp.p b+ 1.5.1 Item Master Report 07/10/09 +------------------------------------------------------------------------------+ ¦ Prod Line: To: ¦ ¦ Item Number: To: 22-130 ¦ ¦ Item Type: To: ¦ ¦ Group: To: ¦ ¦ Added: To: ¦ ¦ ¦ ¦ Print Comments: no ¦ ¦ Reporting Currency: Output: 32prn ¦ ¦ Batch ID: ¦ +------------------------------------------------------------------------------+ If it’s a demo version, the DEMO banner will appear on your screen, hit Enter or ESC key to by pass it, then 32printer window should appear on the screen. Select Excel and either click on GO button or simply hit Enter key. Make sure everything is displayed properly in excel spreadsheet. Run the report few more times and try other output destinations, make sure everything works properly. Congratulations!!! If 32printer window does not come up, try to trouble shoot the problem as following: If you use 32printer with your Terminal Emulator software, make sure the 32printer icon is launched first, prior to your terminal emulator client. Make sure telnet client module is listed in telnet or telent2 parameter in 32printer.ini file. If still no luck try the following: 1) Check if MS Excel and Acrobat Reader are installed on your PC. 2) The Next step is to make sure 32printer is working properly, please start 32printer and go to Start Menu -> Run -> type cmd.exe and then in DOS window type: “telnet your_host_ip” Then login to mfg/pro and try to print a report (for example 1.5.1) to 32PRN, if F1 and F4 keys do not work, use CRTL-X as F1 and CTRL-E as F4. If 32printer popup window appears it means that 32printer is working properly. 3) The next step, to try your telnet client software. Please make sure your telnet client module is listed in 32printer.ini file, as described in User Manual. If not listed, please add it. Launch 32printer and then you telnet client, try any report to 32prn. If still 32printer window does not popup, please contact us. If you are using putty and selecting an existing session – make sure the default printer is set to 32PRINTER. If still no luck contact us. |
||||||||||||
Printing to Local (USB) Printers from QADWith 32printer you can print to any Windows printer directly from QAD, including your USB printers. You need to specify “printer switching record” in the 32prn.sh script (on QAD server), just after the “TURN ON PRINTER” sequence ESC[5i. Start of the record must be equal to “prtSwitch” parameter from the “main.ini” file. The rest of the record must be equal to “printer-queue-id” also defined in the “main.ini” file. When defining printing support in the main.ini file: – Select unique literal constant string as the value of the “prtSwitch” parameter. – Define a parameter for every windows print queue you are going to use from QAD. The name should start with “prt_” prefix following by the “printer-queue-id”. The value of the parameter is used to identify specific Windows printer. Select Windows printers by port name or by printer name. If the parameter value has colon ‘:’ as the last character, the value is considered to be the port name. Otherwise, it’s considered to be a substring of the Windows printer name (it’s not mandatory to define the full printer name). For example, if Windows system has “Apple LaserWriter II NT v47.0” printer and some other printer attached to the LPT2 port, you can include the following lines to main.ini file: ... prtSwitch = @@@^32PRINTER-SWITCH^@@@ prt_lazer = LaserWriter II NT prt_lpt2 = LPT2: To send print job to “Apple LaserWriter” printer you can use the following sequence: To send print job to any printer, attached to the LPT2 port, use the following sequence: On the Unix/Linux-side update the 32printer shell-script 32prn.sh as following:
#!/bin/sh
#
# $1 - file to print
# $2 - "" or printer-id (main.ini must contain line "prt_${2}=...")
#
prtSwitch='@@@^32PRINTER-SWITCH^@@@'
# NOTE: prtSwitch variable MUST BE the same as in main.ini file
echo -ne "\033[5i"
if [ ! -z "$2" ]; then
echo -ne "${prtSwitch}${2}\n"
fi
cat "$1"
echo -ne "\033[4i"
|
||||||||||||
Network SetupThis applies only to versions 3.06 onward. Traditional putty module is using windows registry for session profiles storage. It causes few problems that sysadmins complained about. It was impossible managing session settings from a single place. Now, it’s easy, since session settings are stored centrally in a sub directory and are set as read only for users. When you use a new command line key with putty.exe module, “-fl”, windows registry is ignored. First, you need to run putty with the key: $32prn_home\putty.exe -fl Create a new session, change all the settings as required and save it. It’s saved to .putty sub directory. Make this sub directory as read only for network users. Make a new shortcut with a command line: $32prn_home\putty.exe -load mySession -fl where mySession is the session name created in the previous step. The shortcut can be “placed” automatically to user desktop, at the windows login. |
||||||||||||
Improving Performance by enabling CompressionThis applies only to versions 3.04 onward. In the poor network bandwidth, remote users may complain on the slowdowns when large reports are sent to 32printer. This enhancement decreases data traffic to 7-8 times and the overall performance is improved to 3-4 times. Remote users will notice the difference right away. Here is how it’s accomplished: instead of the 32printer shell script described in the user manual, use the following script on the server side, which compresses the raw data files and transfers it over to desktop. On Linux host use this one: #!/bin/sh
#
# $1 - file to print
#
prtSwitch='@@@^32PRINTER-SWITCH^@@@'
# NOTE: prtSwitch variable MUST BE the same as in main.ini file
echo -ne "\033[5i"
if [ ! -z "$2" ]; then
echo -ne "${prtSwitch}${2}\n"
fi
gzip -c9 < "$1" | uuencode 32PRINTER
# NOTE: uuencode must have '32PRINTER' parameter (checked by prnloc.exe)
echo -ne "\033[4i"
On Unix hosts, AIX, HP-UX use this one: #!/bin/sh
#
# $1 - file to print
# $2 - "" or printer-id (main.ini must contain line "prt_${2}=...")
#
prtSwitch='@@@^32PRINTER-SWITCH^@@@'
# NOTE: prtSwitch variable MUST BE the same as in main.ini file
echo "\033[5i\c"
if [ ! -z "$2" ]; then
echo "${prtSwitch}${2}\n\c"
fi
gzip -c9 < "$1" | uuencode 32PRINTER
# NOTE: uuencode must have '32PRINTER' parameter (checked by prnloc.exe)
echo "\033[4i\c"
|
||||||||||||
Making Functional Keys Working ProperlyIn order to access some special keys (PAGE-UP, PAGE-DOWN, HOME, END, DELETE) in the Mfg/Pro application using putty, both putty keyboard and Progress protermcap file need to be changed Putty profile set-up
Progress protermcap file set-up
For example: cp /opt/dlc/protermcap /opt/dlc/protermcap.orig
Done. |
||||||||||||
Making PuTTY with 32printer connecting directly to MFG/ProA user can connect securely to a Unix server running SSH without needing to enter a password every time. In order to accomplish this, the user needs to generate a key pair, consisting of a public key and a private key. The public key needs to be stored on the server, where the user wants to connect to, in the $HOME/.ssh/authorized_keys file, and the private key is stored on the user’s PC and used by the putty session to connect to the server. In order to set-up a public key authentication, next steps should be followed: Generate a public/private key pair:
On the Unix server, the administrator should
Configure putty for using the private key:
There are a few other advantages of using the public key authentication:
|
||||||||||||
Writing MFG/Pro custom Report for ExcelMajority of MFG/Pro standard and custom reports can be forwarded to MS Excel with 32printer. You can write any report following generic QAD programming rules and the report will be parsed properly in Excel as long as the report layout contains a single frame (see below). There is also a limit on the maximum number of columns in the report and is set to 156 columns. Here is a template that could be used to write wide custom report for Excel. /* Custom Wide report template for 32printer Excel Output*/
{mfdtitle.i "2+ "}
define variable nbr like so_nbr no-undo.
...
define variable nbr1 like so_nbr no-undo.
form
nbr colon 15 nbr1 label "To" colon 49
skip
with frame a side-labels width 80.
/* SET EXTERNAL LABELS */
setFrameLabels(frame a:handle).
repeat:
if nbr1 = hi_char then nbr1 = "".
update nbr nbr1 with frame a.
bcdparm = "".
{mfquoter.i nbr }
{mfquoter.i nbr1 }
if nbr1 = "" then nbr1 = hi_char .
/* OUTPUT DESTINATION SELECTION */
{gpselout.i &printType = "printer"
&printWidth = 132
&pagedFlag = " "
&stream = " "
&appendToFile = " "
&streamedOutputToTerminal = " "
&withBatchOption = "yes"
&displayStatementType = 1
&withCancelMessage = "yes"
&pageBottomMargin = 6
&withEmail = "yes"
&withWinprint = "yes"
&defineVariables = "yes"}
{mfphead.i}
put unformatted
"SO Nbr Ordered AM SRep2 SRep3 Group BUM....." skip
"-------- -------- -------- -------- -------- -------- --------"
skip.
for each so_mstr no-lock
where ... :
put so_nbr
so_ord_date space(1)
slspsn[1] space(1)
slspsn[2] space(1)
slspsn[3] space(1)
user1 space(1)
so_cust space(1)
name space(1)
so_po space(1)
sod_line space(1)
....
sod_site space(1)
sod_type space(1)
so_cr_terms skip.
{mfrpchk.i &warn=false}
end. /* FOR EACH so_mstr */
/* REPORT TRAILER */
{mfrtrail.i}
end. /* REPEAT */
In the case you do not want user to prompt for printer output the report logic may look like the following: {mfdtitle.i "2+ "}
define variable nbr like so_nbr no-undo.
define variable nbr1 like so_nbr no-undo.
...
form
nbr colon 15 nbr1 label "To" colon 49
skip
with frame a side-labels width 80.
/* SET EXTERNAL LABELS */
setFrameLabels(frame a:handle).repeat:
if nbr1 = hi_char then nbr1 = "".
update nbr nbr1 with frame a.
bcdparm = "".
{mfquoter.i nbr }
{mfquoter.i nbr1 }
if nbr1 = "" then nbr1 = hi_char .
/* SEND DIRECTLY TO 32PRN OUTPUT*/
put screen row 22 "Report is running...".
output through ("32printer") . /*or use "paged" keyword if need to*/
/*32printer script should be in the PATH VAR, here is the content"
#######################
echo -n -e '\033[5i'
cat $1
echo -n -e '\033[4i'
#######################*/
for each so_mstr no-lock
where ... :
display so_nbr
so_ord_dateslspsn[1
user1so_cust name so_posod_line
....
sod_sitesod_typeso_cr_terms
with width 200.
{mfrpchk.i &warn=false}
end. /* FOR EACH so_mstr */
output close.
put screen row 22 "".
end. /* REPEAT */
|
||||||||||||
Excel Related Configuration ParametersThese are the Excel related configuration parameters: where: Please note that the new Audit Report is always processed with the second (new,faster) parser, and the output is always in “xlsx” format. Please also note that when using templates, only the first (old) parser can be used, so excelAutomation is reverted to yes, and output format is reverted to “xls”. |
||||||||||||
How 32printer parses QAD report into Excel. Issues Exporting to Excel.Some QAD reports are not properly transferred to Excel, for example 7.15.1. There are a few options of how you may get the information in the proper format to Excel using 32printer software. 1) Lookup another report with the required data, where the information is presented in a flat (single frame) format such as the following:
      Site Location Description. Type Perm
      ---- -------- ------------ ---- ----
      1000 A0000001 Raw Material A001 No
      1000 A0000002 Raw Material B001 No
      1000 C0000005 Raw Material B005 No
      .....
      1000 Z0000100 Raw Material Z999 No
This format layout fits the best for 32printer. Most of QAD reports are designed this way, however some of them have two or more frames (header-details), excessive subtotals, etc… These won’t be parsed properly by 32printer when sending to Excel. 2) You may use any custom report, which presents data in the single frame format (see above). 3) You may use existing QAD browses or inquiries. They generate proper output format too. 4) QAD has a built-in capability to create power browses in the system. These browses also generate proper output format. 5) If you have a progress programmer skills in house, an existing report may be easily reformatted to the flat format above. 6) If you do not have a progress programmer skills, we can help you with reformatting of the standard QAD report (free of charge or for a small fee). So, when you install the new report instance, it will work properly to MS Excel. For outputting to Excel a “standard” QAD reports you need to select “Send to Excel” and “QAD Report”: Starting with version 4.16 a new option was added to parse QAD Audit Trail Report: Starting with version 4.18 a new option was added to parse QAD 5.13.10 Unmatched PO Receipts as of Date: |
||||||||||||
Working with third party terminal emulatorsWhen you use 32printer with your existing Terminal Emulator software, make sure the 32printer icon is launched first, prior to your terminal emulator client. Please check 32printer user manual how the telnet client settings should be set in the 32printer.ini file. In the case 32printer popup window does not appear when printing to 32prn output, please try the following steps to troubleshoot: 1) Check if MS Excel and Acrobat Reader are installed on your PC. 2) The Next step is to make sure 32printer is working properly, please start 32printer and go to Start Menu -> Run -> type cmd.exe and then in DOS window type: “telnet your_host_ip” Then login to mfg/pro and try to print a report (for example 1.5.1) to 32PRN, if F1 and F4 keys do not work, use CRTL-X as F1 and CTRL-E as F4. If 32printer popup window appears it means that 32printer is working properly. 3) The next step, to try your telnet client software. Please make sure your telnet client module is listed in 32printer.ini file, as described in User Manual. If not listed, please add it. Launch 32printer and then you telnet client, try any report to 32prn. If still 32printer window does not popup, please contact us. |
||||||||||||
Fixing Leading Zero dropping issue in Excel. Controlling column types. Character Value is presented as number in Excel.When exporting to Excel, some character values may be misinterpreted and displayed as numeric type, which will cause leading zeros to be dropped. Excel also can add thousand group separators to such values, causing users to complain about this. For example, Customer code 01000000 will be displayed as “1,000,000” in Excel. To fix the problem you will need to add a line to a file called “columns.ini” located in the 32printer home directory. This line should contain QAD report column label value, for example if QAD report has a field with column label “Location”, add a line to columns.ini, which will contain the exact same value “Location”. Or if different reports have labels “GL Accout”, “GL Acct” or “GL Acc”, you may add a line to columns.ini with value “GL Acc*”. 32printer will recognize and present codes as character values. Another words, you may enter either a full label name or partial one with “*” at the end. For example: LOT
|
||||||||||||
Generating Multi Sheet Excel Workbook from MFG/ProThis is a very nice 32printer feature, version 3.03 and higher, when you need detail and summary information in the same Excel Workbook. Or when you need various reports combined into Excel Workbook. 1) Add a line to main.ini file as following: nextSheet = NextExcelWorksheet 2) Write a report which may contain a few sections or can consist of a few reports. Add the following code between sections or between reports
/* Custom Wide report template for 32printer Excel Output*/
{mfdtitle.i "2+ "}
define variable nbr like so_nbr no-undo.
...
define variable nbr1 like so_nbr no-undo.
form
nbr colon 15 nbr1 label "To" colon 49
skip
with frame a side-labels width 80.
/* SET EXTERNAL LABELS */
setFrameLabels(frame a:handle).repeat:
if nbr1 = hi_char then nbr1 = "".
update nbr nbr1 with frame a.
bcdparm = "".
{mfquoter.i nbr }
{mfquoter.i nbr1 }
if nbr1 = "" then nbr1 = hi_char .
/* OUTPUT DESTINATION SELECTION */
{gpselout.i &printType = "printer"
&printWidth = 132
&pagedFlag = " "
&stream = " "
&appendToFile = " "
&streamedOutputToTerminal = " "
&withBatchOption = "yes"
&displayStatementType = 1
&withCancelMessage = "yes"
&pageBottomMargin = 6
&withEmail = "yes"
&withWinprint = "yes"
&defineVariables = "yes"}
{mfphead.i}
/* FIRST REPORT */
for each so_mstr no-lock
where ... :
display so_nbr
so_ord_date so_custnameso_po with width 132.
end.
/* JUMP TO THE NEXT EXCEL SHEET */
put "NextExcelWorksheet" at 1 skip. page.
/* SECOND REPORT */
for each sod_det no-lock
where ... :
display sod_nbr
sod_line sod_partsod_qty_ord ....
with width 132.
end.
...
...
/* REPORT TRAILER */
{mfrtrail.i}
end. /* REPEAT */
Starting with version 4.30 you can name the next Excel Sheets by entering a Sheet name, for example |
||||||||||||
Using Excel Templates with 32printerBy using Excel Templates you will be able to turn exported data into a pivot table or a graph or highlight spreadsheet ranges with different colors (conditional formatting) for better visibility and faster decision making. Any data or format manipulations are possible on the Excel side via VBA. 32printer exports data to excel sheet, lookup macro in the template called “processData” and runs it, then shows Excel window to user. 1) Add or make sure main.ini has the following lines: excelTemplates = .\xlt The first one points to a directory, the location where all Excel template files reside. 2) Prepare a excel template, for example mytemplate.xls, and save it to [excelTemplates] from the step #1. Add a macro to the Excel template (ALT-F11), called “processData”. It may have the whole VB logic or it may call other macro subs or functions. Sub processData()
...
doHighLight
...
End Sub
Private Sub doHighLight()
Dim oSheet As Excel.Worksheet
Dim counter As Long
Set oSheet = Worksheets(1)
' Calculate real sheet dimensions
Dim sheetWidth As Integer
Dim sheetHeight As Integer
sheetWidth = oSheet.UsedRange.Columns.Count
sheetHeight = oSheet.UsedRange.Rows.Count
If sheetWidth = 0 Or sheetHeight = 0 Then
Exit Sub
End If
For counter = 2 To sheetHeight
If counter Mod 2 > 0 Then
Rows(counter).Interior.Color = RGB(255, 255, 0) 'YELLOW
Else
Rows(counter).Font.Color = RGB(255, 0, 0) 'RED
End If
Next counter
oSheet.Activate
End Sub
3) Add Excel directive, to the report raw output file, which will point to the Excel template to use. This directive can be added anywhere in the report raw output file. #Excel template mytemplate.xls This can be done by either modifying QAD report, add a statement anywhere in the report logic: put “#Excel template mytemplate.xls” skip. or create a dedicated QAD output in 36.13.2 mgmgmt05.p b+ 36.13.2 Printer Setup Maintenance 08/15/07 +----------------------------- Printer Definition -----------------------------+ ¦ Output To: 32prnM Destination Type: Default ¦ ¦ Printer Type: ¦ ¦ Description: 32prn macro sample Lines / Page: 66 ¦ ¦ Max Pages: 0 Scroll Output: no ¦ ¦Device Pathname: tmp Spooler: no ¦ +------------------------------ Printer Control -------------------------------+ ¦ Initialize Command: ¦ ¦ ¦ ¦ Initialize Ctrl: #Excel template mytemplate.xls/010/013 ¦ ¦ ¦ ¦ 80-Col Start Ctrl: ¦ ¦ ¦ ¦ 132-Col Start Ctrl: ¦ ¦ ¦ ¦ Reset Ctrl: ¦ ¦ ¦ ¦ Reset Command: 32prn.sh tmp ¦ +------------------------------------------------------------------------------+ |
||||||||||||
Printing to local printers from Terminal server32Printer works well on the terminal server. Here is how printing to the local printers can be done from the terminal server: Make sure or add printers on each client machine, add to the printer names corresponding port names. For example: Apple LaserWriter II NT v47.0 (LPT1) Add the following directives in main.ini file: prt_LPT1 = (LPT1) This way the printers will be available from the terminal server sessions, and from MFG/PRO.
|
||||||||||||
Issues with PDF templatesUse MS Word sample template included into the package as a starting point, when creating a new PDF template. Add a new content to the document, logo, boxes, legal text if required, or simply change existing content. Use ONLY Adobe Acrobat Writer or Distiller or other genuine Adobe products to convert MS Word document to PDF template. Do not use any 3rd party PDF converters as 32printer engine won’t process such templates. If you do not have Adobe converters feel free to send us your Word template, we will convert it for you.
|
||||||||||||
Persistent telnet / SSH sessionsThis solution is found and designed by Ove, we are publishing with his kind consent. Persistent telnet or SSH sessions (GNU Screen http://www.gnu.org/software/screen/) are very handy in environments where remote users experience frequent disconnects from our QAD Unix system. Normally users need to re-login to unix after they have been disconnected, but with persistent session it automatically logs them in to previous session. 32printer.sh script needs to be adjusted when persistent sessions are used. ### check for environment variable $STY which is only set when in persistent session if [ $STY != "" 2>/dev/null ] then ## Assumes that .profile is setting : session=`tty`; export tty ## echo "THIS IS PERSISTENT SESSION" ## sessiontype="PERSISTENT"; export sessiontype echo '\033[5i' > "$session" cat $1 > "$session" echo '\033[4i' > "$session" else ## echo "this is regular session" ## sessiontype="REGULAR"; export sessiontype echo '\033[5i' cat $1 echo '\033[4i' fi Add to user .profile that requires persistent session : session=`tty`; export session In the case of SSH, the session variable is not needed but you could look up $SSH_TTY, which always contains correct shell terminal id. Also in case (SSH again) you are inside screen your $SSH_TTY would differ from tty command output, otherwise they would be same. |
||||||||||||
Generating multi-page PDF document32printer has functionality to merge static PDF pages to generated PDF documents, for example appending Terms and Condition page to PO document. That is done by setting form parameters described in PDF form Configuration Files . Starting from v3.06 32printer can generate multi page PDF documents, so each PDF page of the document can have a different background template with a different content.
In the progress program that generate row output file, add the following command: put control chr(27) “n%template_2.pdf”. Here n% is a literal constant, template_2.pdf is the file name of the new template. The command should be inserted anywhere in the first page, before page-break symbol. This will force 32printer to replace the default background template, defined in configuration file, with the new template “template_2.pdf”. Of course, the second template should be located in the same location as the default template. The row output file should look like this: Content of the first page... Content of the first page... Content of the first page... ..... (ESC)n%template_2.pdf PAGE-BREAK Symbol Content of the second page... Content of the second page... Content of the second page... .....
|
||||||||||||
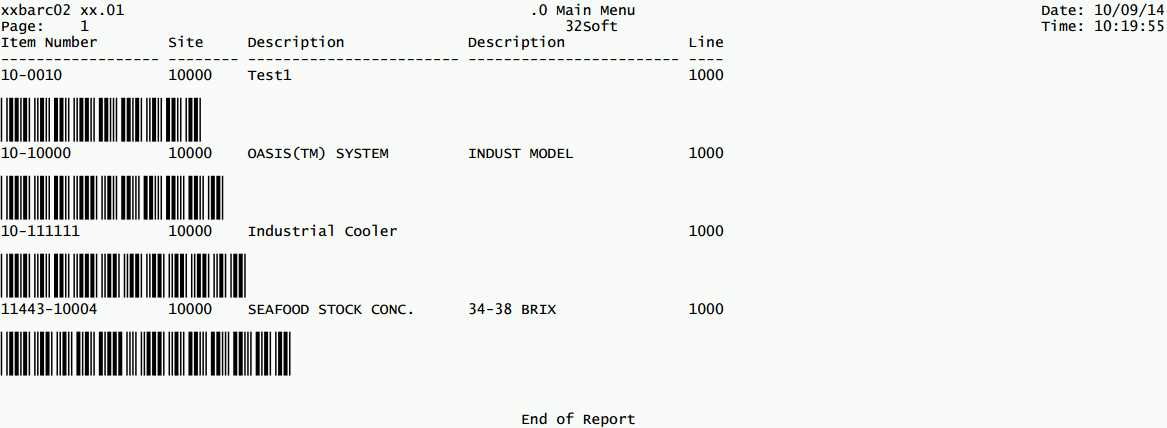
How to implement barcode print to PDF32printer has functionality to generate PDF documents with embedded barcodes Code 39 Here are the steps necessary to implement this output to PDF including barcodes:
Example of a file called barcode132.ini
mgmgmt05.p b+            36.13.2 Printer Setup Maintenance            08/15/07
+----------------------------- Printer Definition -----------------------------+
¦      Output To: 32prn30                           Destination Type: Default  ¦
¦                                                       Printer Type:          ¦
¦    Description: 32printer output 30lines              Lines / Page: 30       ¦
¦      Max Pages: 0                                    Scroll Output: no       ¦
¦Device Pathname: cat >lb$PPID                               Spooler: yes      ¦
+------------------------------ Printer Control -------------------------------+
¦ Initialize Command:                                                          ¦
¦                                                                              ¦
¦    Initialize Ctrl:                                                          ¦
¦                                                                              ¦
¦  80-Col Start Ctrl:                                                          ¦
¦                                                                              ¦
¦ 132-Col Start Ctrl:                                                          ¦
¦                                                                              ¦
¦         Reset Ctrl:                                                          ¦
¦                                                                              ¦
¦      Reset Command: /qad/bin/32prn.sh lb$PPID ; rm lb$PPID                   ¦
+------------------------------------------------------------------------------+
        /* Custom Wide report template for 32printer PDF Barcode Output*/
        {mfdtitle.i "xx.01"}

        &scoped-def visDevs "terminal,page,page100"
        &scoped-def e chr(27)
        &scoped-def st1 (if lookup(dev,{&visDevs}) = 0 then
        &scoped-def st2 else "")
        &scoped-def sNormal   {&st1} {&e} + "f43"        + {&e} + "s9 "   + {&e} + "l10 " {&st2}
        &scoped-def sBarcode  {&st1} {&e} + "fFree3of9 " + {&e} + "s36 "  + {&e} + "l38 " {&st2}

        define variable part          like pt_part initial ""           no-undo.
        define variable part1         like pt_part initial ""           no-undo.
        define variable site          like so_site initial "10000"      no-undo.
        define variable site1         like so_site initial "10000"      no-undo.

        form
          part                                      colon 15
          part1           label "To"                colon 40 skip
          site                                      colon 15
          site1           label "To"                colon 40 skip
          with frame a side-labels width 80.
        /* SET EXTERNAL LABELS */
        setFrameLabels(frame a:handle).

        form
          pt_part
          pt_site
          pt_desc1
          pt_desc2
          pt_prod_line
          with frame c down width 134 no-box.
        /* SET EXTERNAL LABELS */
        setFrameLabels(frame c:handle).

/********** BEGIN MAIN **********/
        {wbrp01.i}

        repeat:
          if part1= hi_char   then part1= "".
          if site1= hi_char   then site1= "".

          if c-application-mode <> 'web' then
            update part part1 site site1 with frame a.

          {wbrp06.i &command = update
                    &fields  = " part part1 site site1"
                    &frm = "a"}

          if  (c-application-mode    <> 'web')
            or  (c-application-mode  = 'web'
            and (c-web-request      begins 'data'))
          then do:
            bcdparm = "".
            {mfquoter.i part  }
            {mfquoter.i part1 }
            {mfquoter.i site  }
            {mfquoter.i site1 }

            if part1= ""  then  part1 = hi_char.
            if site1= ""  then  site1 = hi_char.
          end. /* IF (c-application-mode <> 'web') ..... */

          /* OUTPUT DESTINATION SELECTION */
          {gpselout.i &printType                = "printer"
                      &printWidth               = 134
                      &pagedFlag                = " "
                      &stream                   = " "
                      &appendToFile             = " "
                      &streamedOutputToTerminal = " "
                      &withBatchOption          = "no"
                      &displayStatementType     = 1
                      &withCancelMessage        = "yes"
                      &pageBottomMargin         = 6
                      &withEmail                = "yes"
                      &withWinprint             = "yes"
                      &defineVariables          = "yes"}
          put control {&sNormal} chr(10).
          {mfphead.i}

          for each pt_mstr no-lock
            where pt_part>=part and pt_part<=part1 and pt_site>=site and pt_site<=site1
            with frame c:
            display pt_part pt_site pt_desc1 pt_desc2 pt_prod_line.
            down 1. /*to display barcode on next line*/

            put control {&sBarcode} '*' pt_part "*" {&sNormal}.
            down 1. /*to count the line*/

            {mfrpchk.i}
          end. /* FOR EACH so_mstr */

          /*  REPORT TRAILER  */
          {mfrtrail.i}
        end. /* REPEAT */

        {wbrp04.i &frame-spec = a}
/********** END MAIN **********/
|
||||||||||||
Enabling Chinese fonts in PDF formCreate a new ini file, as a copy of an exiting form, for example reportL132ch.ini. Edit the file and reference the Chinese font: where: The alternative font is used to print non-ASCII characters (characters greater than 255 in Unicode) Use the following settings
You are not limited to only these fonts. You can go to Control Panel / Fonts and browse all existing ones by type. Use any Chinese fonts to generate Chinese PDF’s, Japanese fonts for Japanese PDF’s, etc.. Font control panel will show font type, if you select “detail view” when browsing fonts. Print report to new form output and check resulting PDF file. |
||||||||||||
Direct Excel OutputStarting from v3.08 32printer exports QAD custom or standard reports directly to Excel window, i.e. user selects “32prn” printer in QAD and program opens Excel window with report data, without showing 32printer selection. To enable this functionality first you need a new “switch” added to main.ini file. Type the following line anywhere in main.ini excelSwitch = directExcelOutput Note: the value of excelSwitch can be a random name, i.e. “directExcelOutput” can be replaced to any other, but should be unique enough. The second step you will need to create a new printer in 36.13.2 as following: mgmgmt05.p b+ 36.13.2 Printer Setup Maintenance 08/15/07 +----------------------------- Printer Definition -----------------------------+ ¦ Output To: 32prnXL Destination Type: Default ¦ ¦ Printer Type: ¦ ¦ Description: Direct Excel Output Lines / Page: 66 ¦ ¦ Max Pages: 0 Scroll Output: no ¦ ¦Device Pathname: tmp Spooler: no ¦ +------------------------------ Printer Control -------------------------------+ ¦ Initialize Command: ¦ ¦ ¦ ¦ Initialize Ctrl: directExcelOutput ¦ ¦ ¦ ¦ 80-Col Start Ctrl: ¦ ¦ ¦ ¦ 132-Col Start Ctrl: ¦ ¦ ¦ ¦ Reset Ctrl: ¦ ¦ ¦ ¦ Reset Command: 32prn.sh tmp ¦ +------------------------------------------------------------------------------+ It’s important to enter exactly the same value of the excelSwitch parameter to “Initialize Ctrl:” field. |
||||||||||||
Internationalization: decimal point, thousand separator, date formats.Starting from v 3.08 Excel output no longer has problems with incorrect decimal point, thousand separator or incorrect date format. In case Excel shows incorrect decimal or date format, please add or revise the following parameters in the main.ini file: dateFormat = MM/DD/YY excelDateFormat = MM/DD/YYYY inputDecSeparator = , inputGroupSeparator = . In case the settings are missing in main.ini file, the program will use windows regional settings in control panel. dateFormat parameter tells 32printer how dates are formatted in QAD reports, i.e. this is input date format. excelDateFormat parameter was added in 4.03 version of 32printer, to be able to control Excel Date format as shown above, i.e. this is output date format. |
||||||||||||
Working with Netterm and Secure NettermSome of our clients successfully use netterm and secure netterm with 32prn, here is how to set it up: (See page 28 in User manual : http://www.securenetterm.com/pub/SecureNetTerm.pdf ) In secure netterm window go to menu options -> global settings -> printing ->
|
||||||||||||
Working with WRQ Reflections32printer works successfully with WRQ Reflections, although you have to be administrator on the PC to launch 32printer.exe for the first time. It creates an entry in the registry, specific to WRQ users. After that, other users can work on the PC without admin privileges. |
||||||||||||
Setting up 32printer to run in QAD .NET UIIt is assumed that you already performed all the setup steps mentioned earlier. When you installed 32printer on user workstation, for example into c:\32prn, you should be able to find a file called 32listen.exe. This program listens on a specific port, defined in 32listen.ini file in parameter “Listen”, as shown below. Listen = 10030 Please note, that 32printer .NET UI setup has a known restriction. It can not properly run on Citrix Terminal Servers, but only on individual user work stations. If you need to run 32printer on Citrix, use either putty with 32prn or consider LBOX. Download server .NET UI patch from here, which should be placed into your QAD server. On your QAD server, create a directory, let’s say /qad/32prn – replace /qad with your path. Copy the files downloaded above into /qad/32prn location. Please note that they are binary files!! There will be 2 files in that directory. You have to modify one of them. The best way is to find the character client QAD script, that starts MFG/PRO and update the ttprn.sh accordingly: – you have to specify the location of the databases and their names. The program should connect to 2 DB’s, the main QADDB and to the admin QADADM db. – set DLC variable value with its proper location in your system. Please set permissions on this file as 755. i.e chmod 755 /qad/32prn/ttprn.sh Also replace /qad/32prn value in PROPATH variable, with your appropriate location, pointing to the location of files server directory. Finally, add new printer to QAD’s 36.13.2 menu, as shown below: mgmgmt05.p b+ 36.13.2 Printer Setup Maintenance 08/15/07 +----------------------------- Printer Definition -----------------------------+ ¦ Output To: 32prn Destination Type: Default ¦ ¦ Printer Type: ¦ ¦ Description: 32printer output Lines / Page: 64 ¦ ¦ Max Pages: 0 Scroll Output: no ¦ ¦Device Pathname: cat >tmp$PPID Spooler: yes ¦ +------------------------------ Printer Control -------------------------------+ ¦ Initialize Command: ¦ ¦ ¦ ¦ Initialize Ctrl: ¦ ¦ ¦ ¦ 80-Col Start Ctrl: ¦ ¦ ¦ ¦ 132-Col Start Ctrl: ¦ ¦ ¦ ¦ Reset Ctrl: ¦ ¦ ¦ ¦ Reset Command: /qad/32prn/ttprn.sh tmp$PPID ; rm tmp$PPID ¦ +------------------------------------------------------------------------------+ Replace /qad/32prn with proper location in “Reset Command” above. Try any report to the new printer, 32prn. 32printer window should appear. If not, please make sure User’s PC Windows firewall does not block port 10030 on the PC. Also, please check if there are no other firewalls between user PC and QAD server. Contact us if still problem with setting up 32printer for .NET UI. |
||||||||||||
Antivirus complains on 32printer.exe moduleYour antivirus software may complain 32printer.exe module of 32printer, pointing out that it is infected by virus of some sort. This module has been programmed to work as “hook” to telnet emulator programs. Such mechanism is considered as virus-like by anti-virus programs. In case you use 3rd party emulator program to get to QAD’s Char UI, then you should use 32printer.exe module – in this case simply configure your antivirus to ignore 32printer.exe warning, i.e. consider it as good program. In case you use putty.exe with 32printer, simply delete 32printer.exe module from distribution package, as it’s not in use. |
||||||||||||
What to do when 32Printer window does not pop upQuestion: I have several computers with 32Printer installed and the last two are not behaving like the rest. The install and configuration worked like all the rest and when I compare the configuration between two computers they are the same. On these 2 computers when I try to send output to 32print from QAD instead of giving me the selection box for the output the screen runs through the report like a normal QAD session. This only happens when I am signed on as a user. If I sign on as the administrator 32print works like it is supposed to. Answer: Select 32PRINTER in Printer window, like shown below
|
||||||||||||
How to upgrade 32printer1. If started, stop 32printer.exe and 32listen.exe modules or any putty sessions. To stop 32printer.exe and 32listen.exe, use mouse right click on the icon and select Exit. $32printer\*.exe $32printer\*.dll 4. Obtain new license file from 32soft |
||||||||||||
How to create a new PDF Form1) Use MS Word to create a new template with your logo, boxes, legal blurbs, etc.. |
||||||||||||
How to send Excel output to Google DriveStarting with version 4.15 there is an option to send Excel output to Google Drive. If asked, enter Google credentials and accept for 32printer to access Google Drive: Once done a message will be displayed with the Excel file name uploaded to Google Drive: Please note that a new folder called “token.json” will be generated in the 32printer folder. |